
How to use custom containers in SageMaker for inference with LightGBM (step-by-step guide)

When working with machine learning models in production, we often focus on serving predictions in real time. But what happens when you need to process large volumes of data offline? That’s where batch inference comes in.
On AWS, the service designed for this kind of operation is SageMaker Batch Transform, a solution that lets you apply models to entire datasets without needing to spin up an inference endpoint.
Now, Amazon SageMaker natively supports several frameworks like XGBoost, TensorFlow, and PyTorch, but models like LightGBM (a fairly common one in the field) aren’t included among AWS’s prebuilt containers. So if you want to use it for batch inference, you need to build your own container.
Explaining how to do that is the goal of this tutorial. In this step-by-step guide, we’ll show you how to:
- Write local code for predictions with a LightGBM model.
- Package it inside a Docker image compatible with SageMaker.
- Push that image to Amazon ECR and use Batch Transform to run inference on files stored in S3.
No magic involved, just clear explanations designed so you can adapt this to your own projects.
What is AWS SageMaker AI?
Amazon SageMaker is a comprehensive machine learning (ML) platform on AWS that simplifies and accelerates the workflow for data scientists and MLOps professionals. It abstracts infrastructure complexity, letting you focus on deploying AI-powered operations rather than managing resources.
It supports every stage of the ML model lifecycle, from data preparation with integration into AWS services like S3 and Glue, to flexible and scalable training with popular frameworks (TensorFlow, PyTorch, etc.) on automatically managed CPU/GPU instances. It offers distributed training, hyperparameter optimization, and experiment tracking.
It simplifies production deployment with real-time hosting for low latency and batch processing for large datasets. It also provides continuous monitoring to detect issues like data drift and performance degradation.
SageMaker includes built-in tools such as Jupyter-based notebooks and SageMaker Pipelines for automating and orchestrating workflows, boosting productivity.
What is SageMaker Batch Transform, and how does it differ from real-time inference?
When putting a model into production, there are two main ways to serve predictions: real-time inference or batch inference.
-
Real-time inference involves exposing the model through an HTTPS endpoint (like an API). Each time a request arrives, SageMaker processes the data and returns an instant prediction. This approach is ideal for interactive applications like recommendation systems or real-time fraud detection, where latency is critical.
-
On the other hand, SageMaker Batch Transform is designed for scenarios where you don’t need immediate responses, but need to apply the model to large volumes of data in a massive, offline fashion. Instead of sending records one by one, Batch Transform takes entire files from S3 (for example, a CSV with thousands or millions of rows), runs predictions in parallel, and saves the results back to S3. You don’t need to keep an endpoint active or worry about model availability.
Summarizing the above in a simple table:
| Feature | Real-Time Inference | Batch Transform |
|---|---|---|
| Latency | Low | High (batch processing) |
| Costs | Continuous (endpoint active) | Per use (per job executed) |
| Ideal for | APIs, live applications | Periodic or massive jobs |
| Input/Output | JSON per request | Files in S3 |
Let’s get to work!
This is a somewhat intermediate tutorial, but don’t worry, we won’t leave you stranded. We’ll also share some links in case you need to brush up on any topic.
All the code you need to follow along is available in this repo.
Prerequisites
Before diving into this tutorial, you should have:
- Knowledge of Python and AWS. Familiarity with Python virtual environments.
- Basic knowledge of running Bash scripts.
- Basic knowledge of Machine Learning, specifically classification with decision tree ensemble models.
- Basic Docker knowledge: we’ll be creating a custom image to run our model.
Required resources
- AWS account with permissions for SageMaker and ECR (there may be a cost of $1-2, mainly for Docker images stored in AWS ECR)
- Local installation of Docker
- Local installation of Python
- Local installation of Poetry
- Local installation of aws cli
- Local installation of VSCode (optional)
Python environment
We install dependencies in a Poetry environment. Opening a terminal in the working directory for this tutorial, use the commands:
poetry init
poetry add numpy lightgbm scikit-learn pandas kagglehub
To work with Jupyter notebooks in VSCode, you’ll also need to install the ipykernel package. VSCode will offer to do this when you run the notebook for the first time.
Another option is to grab the project.toml from the repository, paste it in your working directory, and run poetry install in the shell. This will create the environment with the required dependencies automatically.
Dataset preparation
-
Choose a dataset. In our case, fraud detection dataset. You can download it by installing kagglehub in your local Python environment.
-
It’s a dataset for a classification problem, where the goal is to predict, based on PCA-derived features plus a time variable and transaction amount, whether a transaction was fraudulent or not.
-
Download the dataset locally, make sure to separate the features from the target, then split into train and test, and save both datasets in CSV format.
-
All of this is done in the notebook dataset/prepare_data.ipynb.
Step 1: Local code for inference with LightGBM
1.1 Train the model
The starting point is a notebook that handles training and testing (sagemaker-batch-transform-tutorial/local_code/01_train_and_test.ipynb). This notebook simply loads the dataset, splits it into train and test data, trains the model, and saves the trained model.
But we need to split it into two parts: the training script and the testing script. This way, we save the model separately and can start parameterizing the dataset and model folder paths.
The training script loads the training data, separates model features from the target, defines and trains the model, and saves the trained model locally as a pickle file in the specified folder.
The test script loads the test data, separates features from the target, loads the trained model, runs predictions, and prints the model’s accuracy.
The local scripts are the functional foundation (quick to iterate and debug). In Step 2 we’ll adapt them to pull data/model from S3 and run inside a Docker container compatible with SageMaker, moving from “local test” to reproducible jobs (Training/Batch Transform) without rewriting logic. Here’s how:
Step 2: Build a Docker container for inference with LightGBM
In this section, we take the scripts developed earlier, parameterize them to read file paths from S3, and build the Dockerfiles and scripts that will serve as entrypoints for train and test.
We have the following folder structure:
- We create folders for train, test, and models. The “dataset” folder sits one level up.
- You need to upload the CSV files used for training and testing to S3. Create a bucket and replace the name where applicable: throughout the tutorial you’ll see it as
<your-bucket>. Inside it, create a datasets folder, with train_data and test_data subfolders where you upload the generated CSV files. - The structure should look like this:
s3://<your-bucket>/datasets/train_data/train.csv
2.1 Build the image
From the containers directory, run the command to build the image according to the Dockerfile instructions (it’s very standard, nothing unusual).
docker build -t lightgbm-train ./trainTo run it, we write a shell script that loads the AWS access keys and passes the S3 paths needed to fetch data and save the model.
Now comes the fun part. This script is designed to run inside a container on SageMaker: it pulls training data from S3, trains the LightGBM model, and uploads the result back to S3. It’s the foundation for integrating it into a reproducible SageMaker Training Job.
To run training, simply execute the training shell script:
$./train.sh2.2. Run inference
To run the inference container, we write a shell script that loads the locally configured AWS access keys and passes the S3 path needed to fetch the model.
With that ready, we can build the image using:
docker build -t lightgbm-test ./testAnd what does the test script do?
What it does:
- Downloads the test dataset and trained model from S3.
- Loads both into memory.
- Runs predictions using LightGBM’s
predict_proba(). - Prints the positive class probabilities.
Step 3: Push images to ECR and run on SageMaker
In broad terms, in this section we’ll cover:
- How to build containers to train our model with a SageMaker Training Job,
- How to register it in the SageMaker Model Registry,
- How to use it for batch inference on data in S3.
For the training and inference jobs, we’ll make minor adjustments to our containers, and to launch the jobs and register models, we’ll use Lambda functions. But first we need to be authenticated with our AWS account and have the AWS CLI installed and configured.
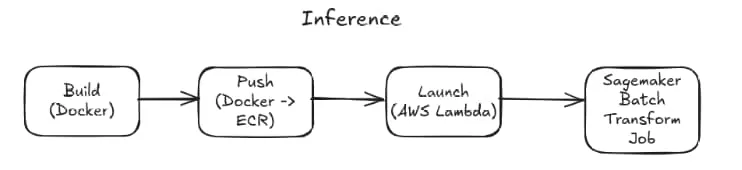
Visually, the steps to perform SageMaker Training Job training and SageMaker Batch Transform Job inference are described in the following diagrams:

3.1. Login to ECR and create repos
The first step is creating the repo, which we do just once. You’ll also need to replace some characters and IDs with your own account details:
aws ecr create-repository --repository-name lightgbm-testing-containerSave the URI returned by the command, which we’ll call <repo-uri> from now on. It should look like this:
`<your-account-id>`.dkr.ecr.us-east-2.amazonaws.com/lightgbm-testing-containerNow log in with Docker:
aws ecr get-login-password | docker login --username AWS --password-stdin `<your-account-id>`.dkr.ecr.`<region>`.amazonaws.com3.2. Build & Push
Navigate to the containers_sagemaker/ folder and from there run:
docker build -t lightgbm-test-sm ./testWith that done, tag and push the image:
docker tag lightgbm-test-sm:latest <repo-uri>
docker push <repo-uri>
3.3. Host the data
Finally, we need to put the data in an S3 bucket, ideally at a path like this:
s3://<your-bucket>/datasets/train_data/train.csv3.4. Lambda function: Training Job
Now we’ll use a Lambda to launch the training job.
Important: you need to have an IAM role with permissions to access and execute on S3 and SageMaker. For the example, we created one called free-tier-sagemaker-full-access-role with AmazonS3FullAccess and SagemakerFullAccess policies.
Now we need to create the Lambda lgbm_sm_launch_training_job. This Lambda has a SageMaker layer (here’s a post of ours where we also explain how to use them, in case it helps), so we need to install the requirements locally and create a package that gets uploaded along with the function. Since the package exceeds 50MB, it needs to be uploaded to any S3 location and loaded into the Lambda service from there.
An important detail in this Lambda’s requirements.txt: we need to use version sagemaker==2.215, otherwise we’ll get the error: “No module named ‘rpds.rpds’”. This kind of error is very common when installing packages from different sources.
Notice how we’re installing dependencies: the -t package/ at the end installs the libraries inside the local package/ folder instead of the global or virtual environment (site-packages). This is common in projects like this one, where we need to package dependencies along with our code (as is often necessary in a Lambda).
For the function to use the packaged dependencies, we need to attach them as a Lambda Layer. This is done from the AWS Lambda console, under the Layers tab, by creating a new layer and uploading the lambda_package.zip file (or pointing to its S3 location).
Once created, the layer is available and can be attached to our lgbm_sm_launch_training_job function from the console or via AWS CLI. This way, the Lambda will have access to the required libraries (in this case, sagemaker==2.215) without exceeding the deployment package size limit.
Another important detail: the local Lambda’s Python version must match the Python version set when creating the Lambda in the AWS console (UI).
After the Lambda runs successfully, you’ll see that a SageMaker Training Job has been launched, and when it completes, your freshly trained model will be located in the directory specified in the Lambda (in our case, s3://<your-bucket>/models_sm/).
3.5. Lambda function to register the model
Here, we want to register the model in the SageMaker Model Registry so that the Docker image hosted in ECR is linked to the ARN of the model trained by the SageMaker Training Job. This way, going forward, when the image is invoked, it will use the specified model.
The key point is the call to create_model to register a new SageMaker Model, linking:
- The inference container (Docker image in ECR).
- The trained artifact (model in S3).
- The IAM role that authorizes execution.
With this, the model is registered in SageMaker and available for use in endpoints or Batch Transform Jobs.
3.6. Lambda function to launch the Batch Transform Job
In this case, we’ll create a transformer that receives as its most important parameter the model name exactly as it was registered in the SageMaker Model Registry in the previous step. Note that no other data or location of the trained model is referenced: everything is pulled from the SageMaker Registry.
The Batch Transform Job is created using the Transformer’s transform() method. This method lets you specify which columns of the input dataset are sent to the model for inference, and how the predictions file is composed: you can choose to output only predictions, or also include the features used for inference and the ID column that identifies each input record (if one exists).
After the job completes, results will be in your S3 bucket. If you want, following the bucket naming convention we’ve been using, you can download them with:
aws s3 cp s3://<your-bucket>/predictions/test.csv.out .In conclusion…
We’ve built a custom, scalable solution for running batch inference with LightGBM models on SageMaker. This architecture allows you to reuse trained models and maintain reproducible pipelines in a professional MLOps environment.
In future installments we can look at operations complementary to inference itself, necessary for building a robust production model.
Thanks for making it this far! Questions or suggestions? You can reach out at fernando@deployr.ai or leave a comment on the blog.
Additional references:
- Fraud detection dataset
- Batch transform for inference with Amazon SageMaker AI
- Example: Customer Churn Prediction with XGBoost
- Batch Transform Input and Output Filters
- Tabular classification with Amazon SageMaker LightGBM and CatBoost algorithm
- Sagemaker Batch Transform – Emily Webber from AWS
- Containers for Batch Transform and inference
- Amazon – Adapt your own inference container
- SageMaker – Bring your own container


