
Go serverless by building an automated Twitter scraper on AWS in five simple steps

This post was written before Twitter’s name change and the subsequent removal of its API. While you won’t be able to replicate this exact example, the approach applies the same way to any other API. Some interesting APIs for practice include Binance or Openweather.
Serverless, or “the worst-named concept in history”
If you’re just starting your data career, or if you’re only now getting into the cloud world, you’ve probably encountered the term serverless more than once. Although the name might make you think it means “without servers,” the idea is actually completely different.

Serverless means that the developer doesn’t have access to the underlying infrastructure, which is typically provided by a cloud vendor (AWS, GCP, Azure, etc).
It’s worth mentioning that serverless has been gaining momentum in recent years because it offers significant advantages for both developers and the business side:
-
While it can be a double-edged sword, the advantage for data scientists and developers in general is that there’s low risk of installing something that could break an environment.
-
On the business side, in most cases a well-designed event-driven serverless architecture delivers greater cost efficiency and control over what’s happening across an organization.
The serverless world can be intimidating, so the best thing is to see it in action. This is the first of three articles where we’ll progressively build toward an increasingly automated architecture, growing a project where we’ll query the Twitter API and store the results in S3 for later processing.
Let’s get to work!
What we’ll need for this stage:
-
A Twitter developer API Key (v2 of the API is instantly available and is enough for our purposes).
-
AWS access with roles that allow us to interact between Lambda, S3, and EventBridge.
-
An S3 bucket.
Optionally, access to an AWS SageMaker notebook (and the required roles, especially for connecting to S3).
Step 1: Building and testing the scraper
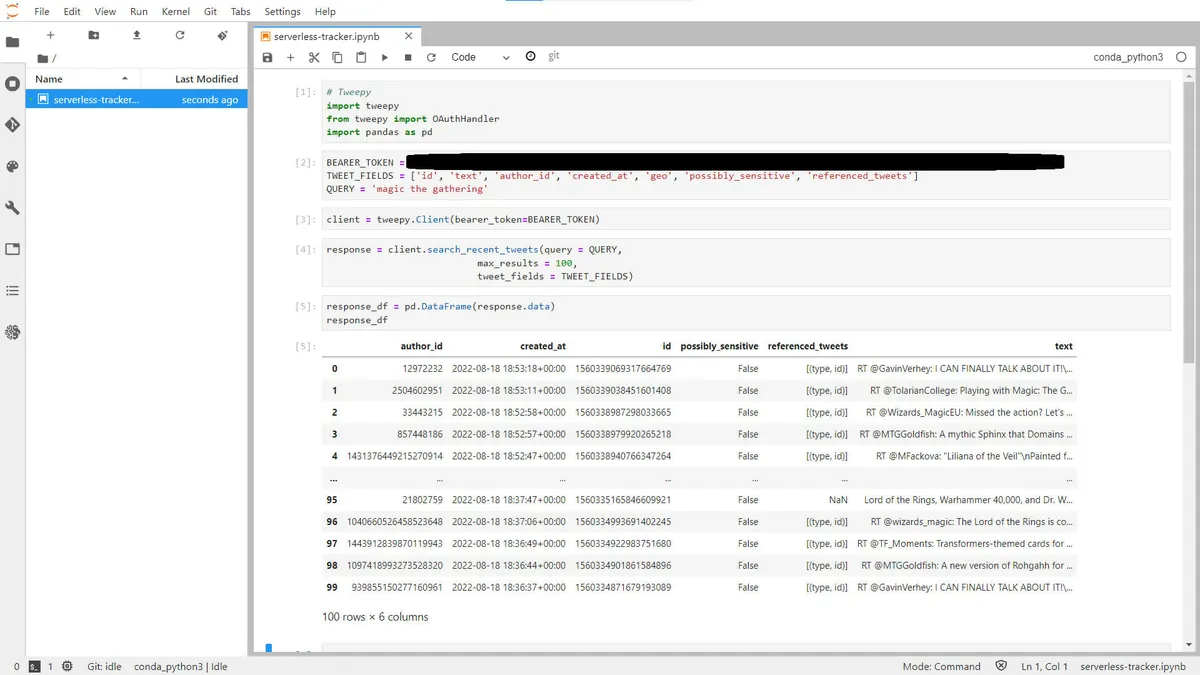
Let’s look at the scraper code:
-
With tweepy we can interact with Twitter’s services. The documentation is very comprehensive and includes methods and classes for both v1 and v2 of the API.
-
We authenticate using OAuthHandler, where we pass the bearer token that Twitter gives us when we create the application. It’s very important to keep these access keys secure; they are under no circumstances public. Normally we start by hardcoding it, but later we’ll see how to store that key in an environment variable on the Lambda that will execute the Twitter call.
-
We grab the tweet fields we’re interested in.
-
The query can be anything… like news about Magic. Yes, that’s the query I tested it with, and no, I have zero regrets.
-
First we instantiate the client with our access key and search for tweets with some parameters of our choosing.
-
We convert the response to a Pandas dataframe, and that’s it!
Step 2: Upload the data to an AWS bucket
The next step is uploading them to an S3 bucket (simple object storage) so we can work with them as needed.
Here’s how:
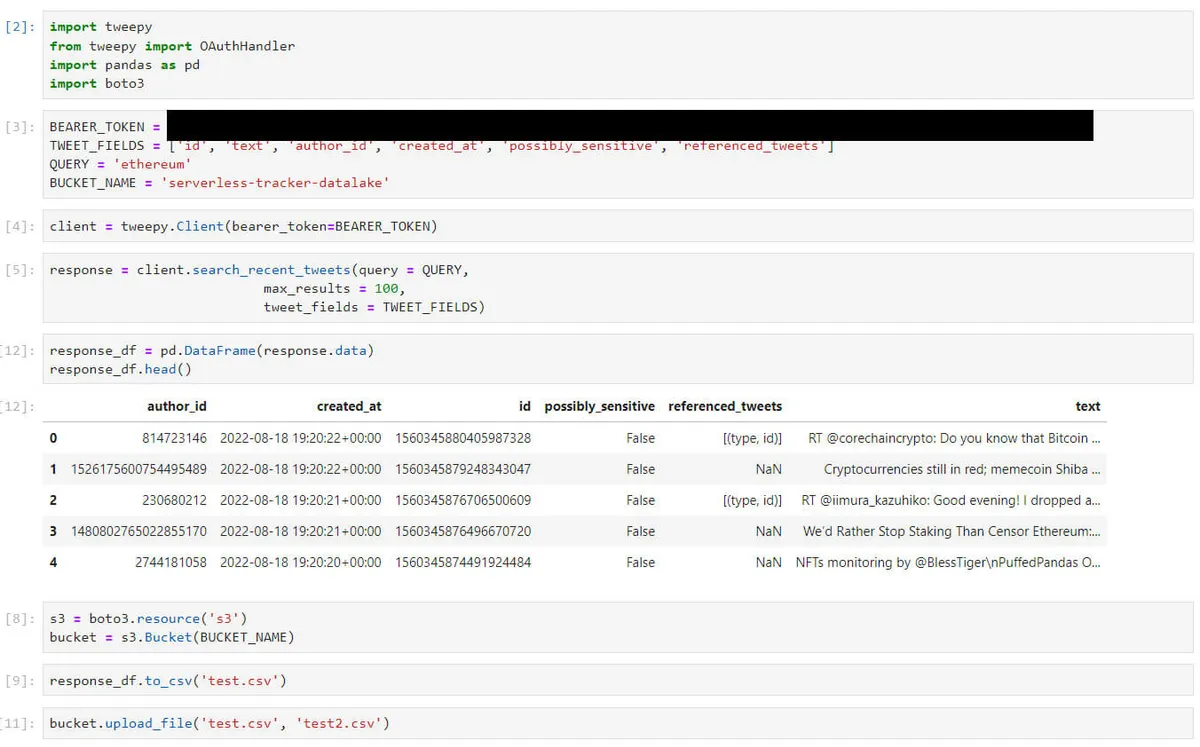
-
Now I put in the final query: we’re going to search for what people are saying about Ethereum, but it could be anything!
-
We instantiate a variable with our bucket name. This indirect way of building paths (not making the direct call to the name when creating the s3.Bucket object, but rather using the variable called BUCKET in cell 8) will be very useful later (and is a best practice).
-
In cell 8 we use boto3 (the Python library for interacting with AWS services) to instantiate S3 access, and through that, access to the bucket we want to work with.
-
Note: to upload things to S3 we first need to save the data to disk (dump it), because the dataframe we pulled from Twitter is stored only in RAM (we save it as test.csv).
-
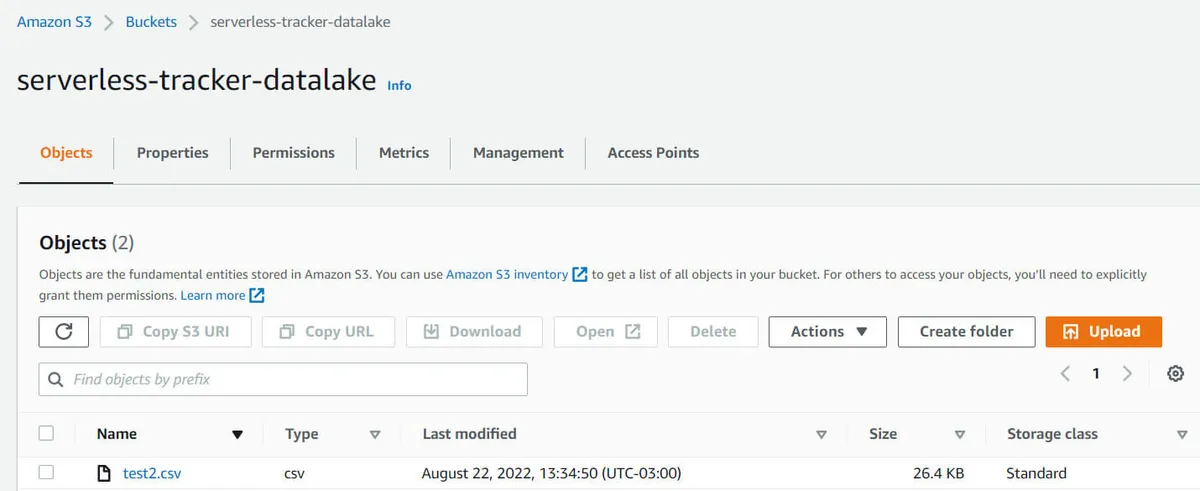
To upload it, through the bucket object we specify the path and name of the file we want to upload (“test.csv”) and the same for the file as we want it to appear in the cloud, whose path and name can perfectly well be different (and usually will be, as in the example, where it’s called “test2.csv”):
Step 3: Build the Lambda layers
Here’s where we kick it up a gear and go all-in on the cloud!
Lambdas are functions-as-a-service: we provide the code and AWS spins up infrastructure behind the scenes to run it. Since the idea is to keep everything as lightweight as possible, Lambdas come with only the essential libraries by default.
That’s why, to use a not-so-basic library (you might be surprised, but that includes Pandas!), we need to add layers that extend the default functionality.
AWS has some built-in ones for common cases (we’ll use the one that adds Pandas, precisely), but for less common cases (like Tweepy) we have to build them ourselves, and for that we need to install the library locally.
Before building the Lambda itself, let’s create that layer:
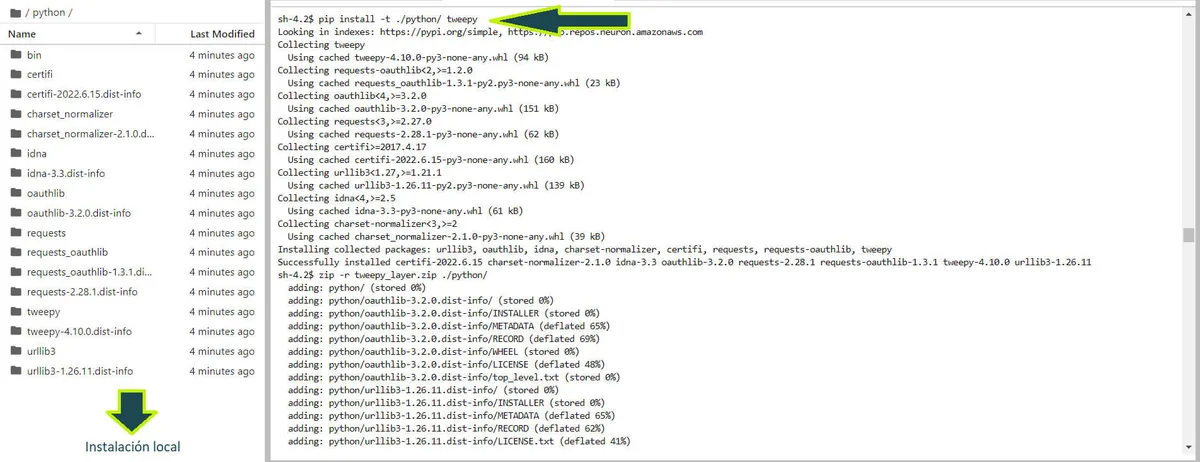
-
We do a classic pip install, but add the -t argument, which specifies the target installation directory. In this case, we point to a folder called python that I created beforehand: that name is required and mandatory for the Lambda to work.
-
You’ll see that once it finishes, the python folder contains all the library installation files.
With that done, the next step is to zip it and upload it as a Lambda layer, which you can do either by uploading directly or pointing to an S3 path containing the .zip file. Fortunately the interface walks you through it and it’s not complicated: the only required field is the layer name (in our case, tweepy).
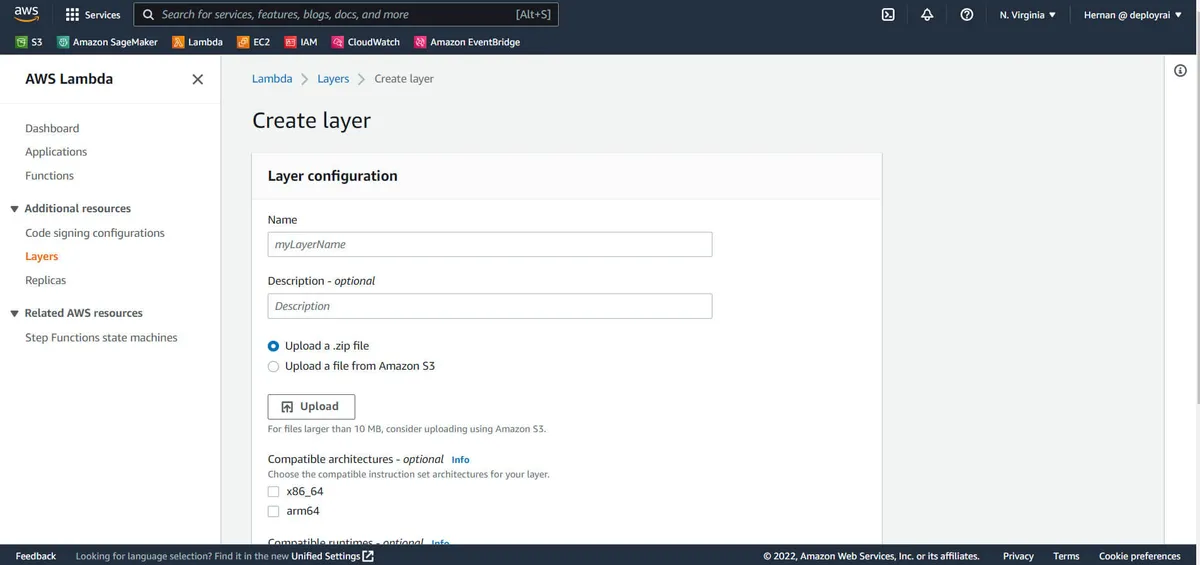
Step 4: Build the Lambda
With everything ready, we can build the Lambda itself.
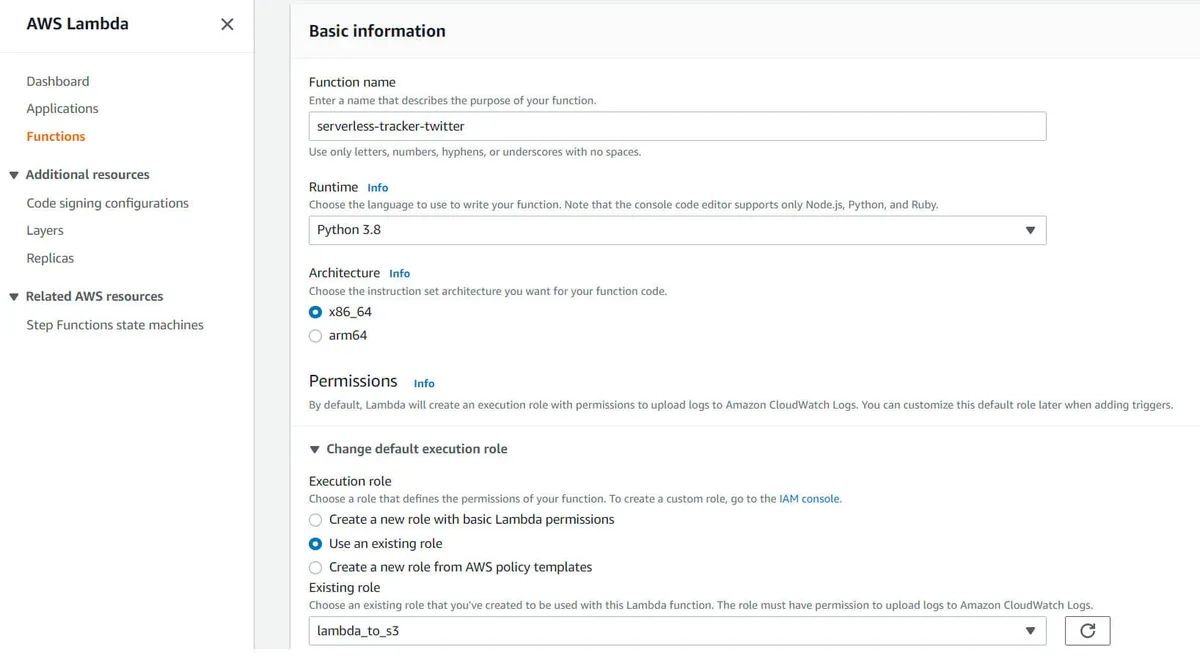
-
We need a name (your choice), a runtime (Python 3.8), and an architecture (x86_64).
-
For permissions, we need a role with write access to S3. If you’re not sure how, here’s a post where we explain how to do it.
With that done, it opens a text editor where we can write our code. The new version has few but significant changes:
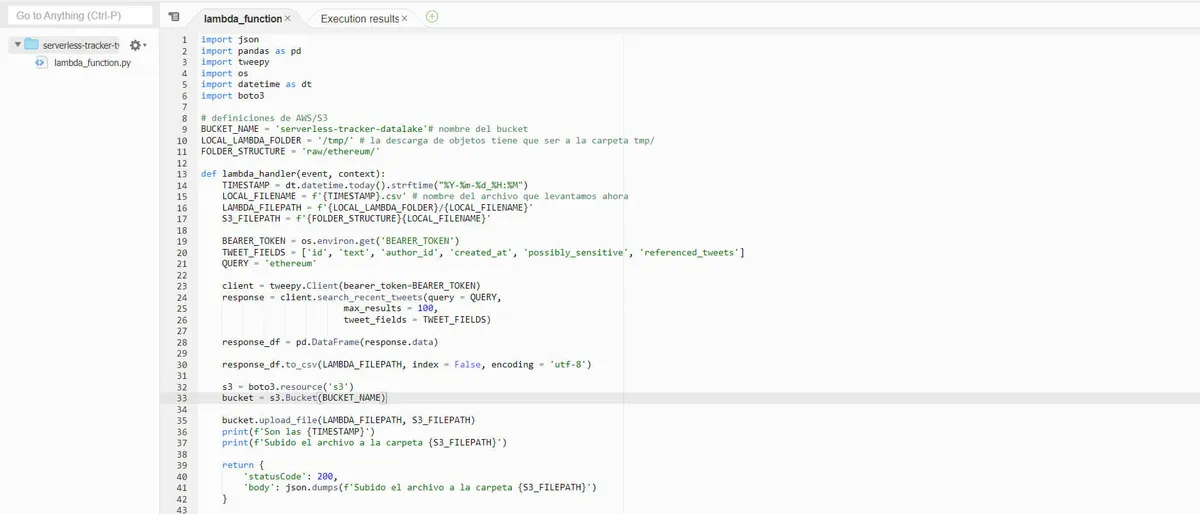
-
There’s a function called “lambda_handler” in the middle. Without going into details, that’s the function AWS will automatically execute, so all the code we want to run needs to go inside it.
-
From top to bottom: we import libraries and instantiate some variables with names. Through string concatenation of these variables we’ll build both file paths and filenames programmatically:
-
LOCAL_LAMBDA_FOLDER: To write to disk in a Lambda context, we need to save everything inside the tmp/ folder.
-
FOLDER_STRUCTURE: Using boto3 we can upload to any location we want, as long as the path is correct. With this approach we build a clean structure for storing data.
-
First we get a timestamp that we’ll use to build the filename, appending the file extension on the line right below.
-
That LOCAL_FILENAME (date + extension) is used to build the S3 path (respecting the datalake structure) and the path where the file will be after being dumped.
-
Here we use Lambda environment variables to hide the API Key. Through OS, we access an environment variable called BEARER_TOKEN that we defined in the interface, in the corresponding section:
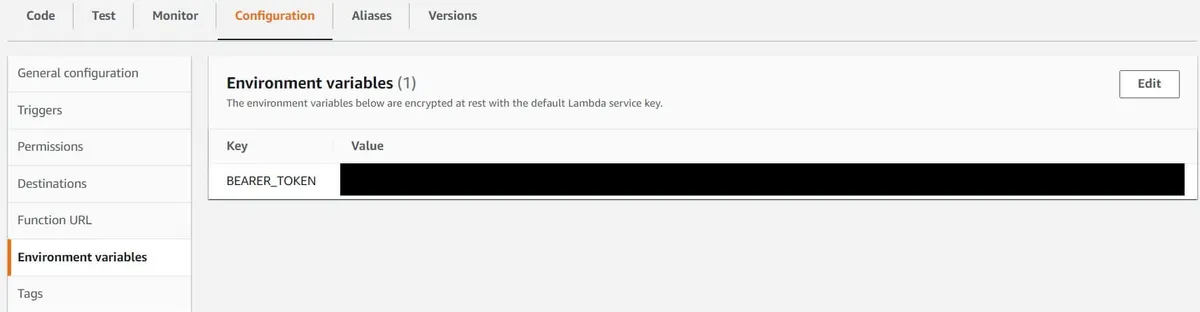
- Finally, we add some console prints for log monitoring.
With the code ready, we add the layers. At the top, below the function name, there’s the Layers section. The process is straightforward: click and add the layers you need:
-
First, from the AWS Layers option, choose AWSDataWrangler-Python38 (the one matching the Lambda’s Python version).
-
Then, from Custom Layers, choose the option we created.
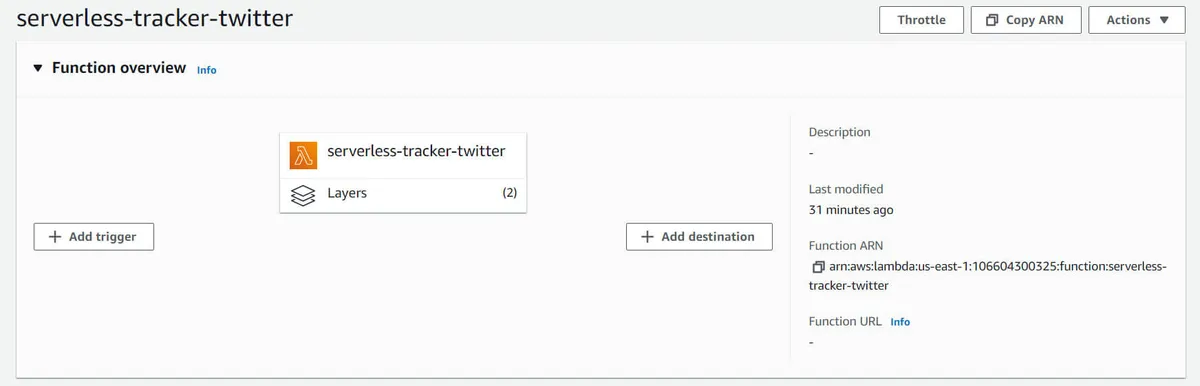
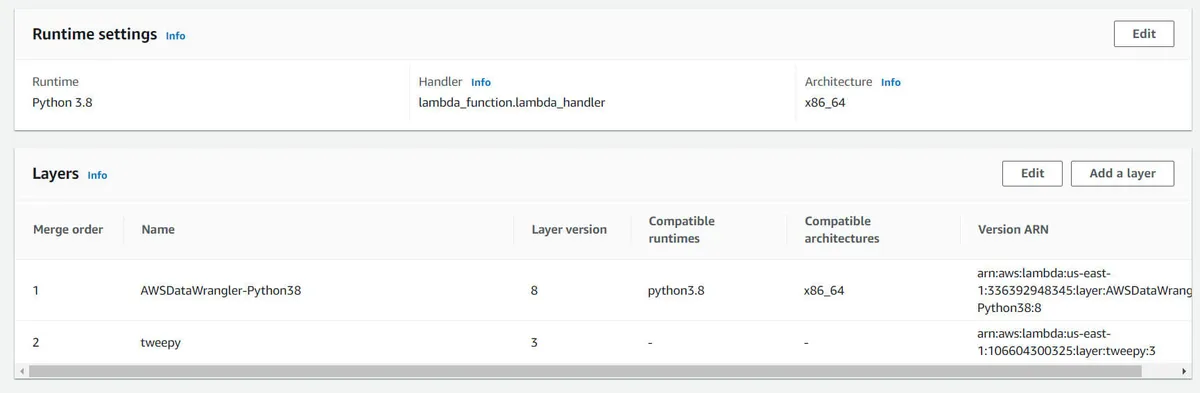
Now it’s time to test! Click Test, give the event any name, and run the test. If everything went well, you should see a freshly created .csv file in your S3 folder.
Part 5: Schedule the execution
The last step is setting up the event that triggers the Lambda on a schedule. Click Add Trigger and build the rule:
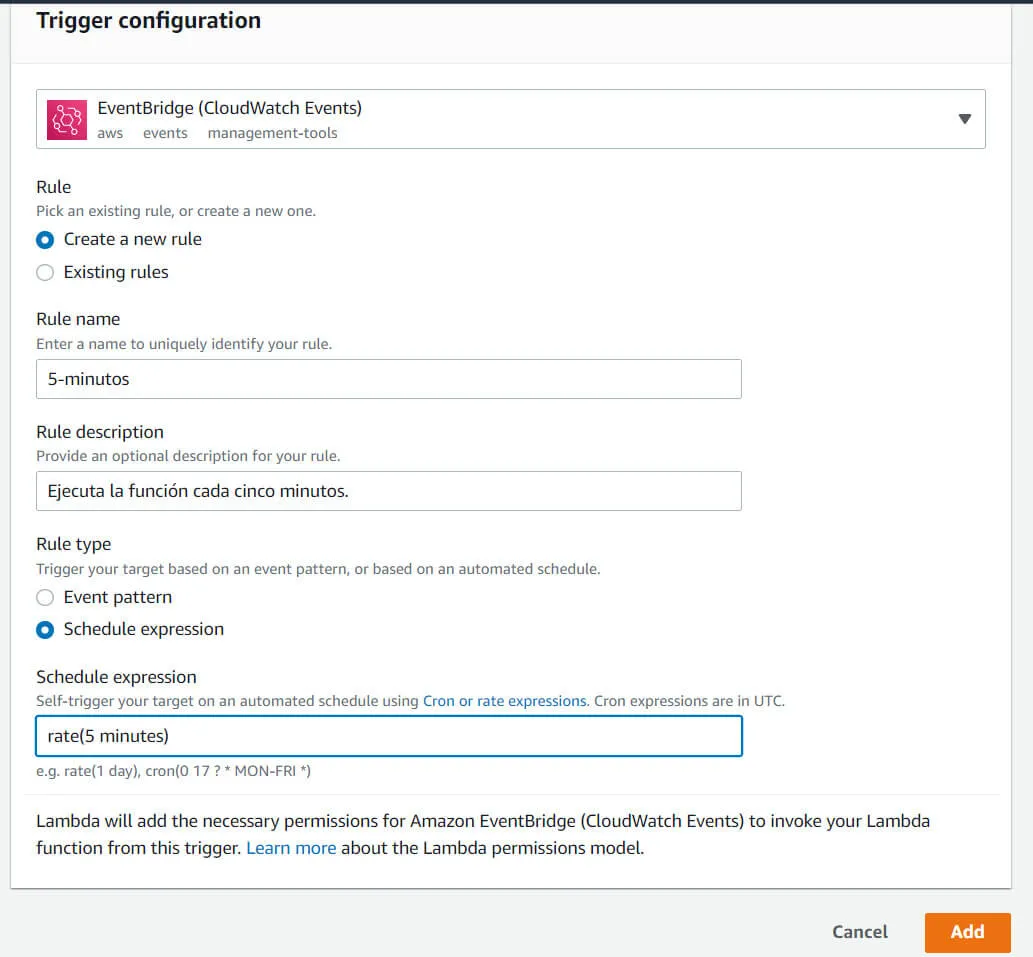
As a nice touch, besides classic cron expressions (UNIX), it accepts some English expressions (like the one in the example). Click Add, and if everything went well, it will execute every five minutes.
What’s next?
-
The event and testing part: so far it seems esoteric, but it’s a crucial piece of orchestration with EventBridge.
-
Right now it’s saving everything in the same folder, and that’s obviously not how you store things in a datalake. For that we need to partition the data, storing each piece in much more granular folders based on when the information was extracted from Twitter.
But that’s for part 2!


